How to Effectively Restring Your Guitar. Are You Doing it Wrong?
Taylor Petrie
Introduction
For any beginner guitarist, it can be quite a dilemma to change the electric guitar's strings for the first time. Fortunately, today I will give you a step-by-step on how to perform this task. Although it may seem complex or confusing at first glance, changing the strings is quite simple.
There are more efficient ways of doing it than others. You might just be curious about what tools you could purchase to make life a little easier when performing this "complicated" surgery. So, please take note and let's get started!
Bottom Line Up Top
Changing strings is a fairly straightforward and simple process. Make sure you loosen, remove and place strings in the same order you took them off. If it's the first time you're doing it, do it one string at a time. If not, take some time and clean down your fretboard when you take them all off.
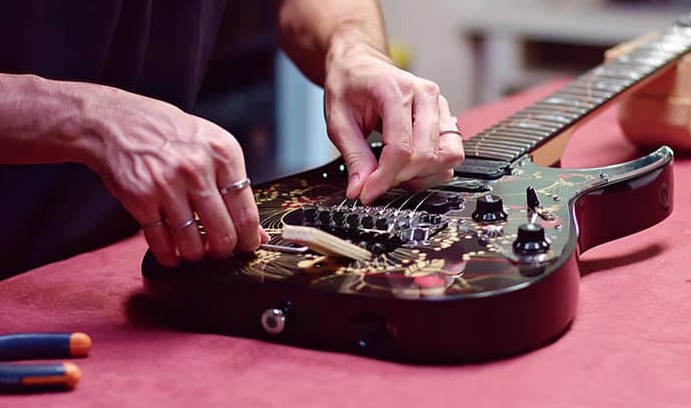
Most guitarist start off placing the 6th string (the lowest) first because it is the hardest to get to twirl around the peg. Once you've threaded the string through the peg, just bend it around in an "s" figure and start to tense the peg patiently.
How Often Should I Change Strings?
Generally, you should change the strings on an electric guitar more frequently than on an acoustic or steel-string guitar, depending on your usage and the type of bridge. A guitarist who plays constantly may change his strings every month or more frequently, but most guitarists can do it every 3 or 4 months. Changing the strings on your electric guitar should be a relatively straightforward process, but it does take some practice.
Change the strings when you notice that they are rusty or sticky or go out of tune quickly. If you are a dedicated guitarist, you probably change your strings very often. Some players even do it every week. If you notice that your guitar strings are sticky, slowing you down, or if you have to retune them too often, take it as a sign that you should change them. If it has been more than 3 or 4 months since you last changed the strings, buy new ones.
Before we get started, here are some tips to keep in mind:
Please make the most of removing all the strings from your guitar to clean it. At the very least, wipe it with a cloth and clean the dust off the pickups. Usually, it isn't easy to clean that place when the strings are on.
If you have your guitar tuned to a lower scale, you may need to switch to standard tuning to keep the strings in tune at first. Note that this is more necessary with larger gauge strings.
Strings can accidentally break when you are tensing or releasing them. If that happens, they are likely to be quite sharp. Keep your face away from the guitar while turning the pegs to avoid accidents.
If you are playing a gig that day, change your strings in the morning to prevent them from breaking unexpectedly.
The pegs have no markings, but you'd better replace the strings in the same order you took them out. The top string is attached to the first peg on most electric guitars. The following string goes on the next peg, and so on.
Choose the Right Strings! Choose the Right Gauge!
This is the first thing is, depending on the type of guitar you have, you will have to choose the most suitable strings for it. The best gauge depends on the genre you want to play and the tuning you intend to have your guitar in.
As it is well known, electric guitars use metal strings that can be found in different gauges, such as 0.9 (the standard) as well as 0.10 and 0.11, which are usually used to play more "extreme" or "heavy" musical genres. So, having defined the musical genre, you wish to play with your electric guitar, choose the type of strings that is most convenient for you. Higher gauge strings are usually more optimal for lower tunings, Drop B, Open D, and such.
On the other hand, the brand of strings you use can also play an essential role in the final result of the sound and the duration of those strings. You can go for top-tier brands such as 'Ernie Ball', 'Elixir' or 'Dean Markley'. The important thing is that you find the brand that offers you the best price/quality ratio results.
My Top String Set Pick
My personal recommendation usually goes to Ernie Ball for electric guitars. On acoustic guitars, I use Elixir strings.
Standard Tuning: With E Standard, you´ll be good with 10-46 strings, although you can get 9-42 if you prefer even less tension when playing. the downside is you will easily pull to hard on the strings and pull it slightly sharp or flat.
If you want an even beefier bottom string, try some 11-52. You can still play them for a while until they wear out and that way you can discover what gauge you´re actually into.
There are different little tools made by different brands that ultimately make all tasks at hand a bit easier: unwinding the strings faster, cutting off the ends of poking out strings, removing the acoustic guitars string pins and tensing strings much faster. This is especially useful if you're in the middle of the gig and there is no other guitar, and it has to be done there and then, asap. The best option I know of is the Daddario DP0002 Pro-Winder.
Loosen the Old Strings: If this is the first time you will change the strings and retune the guitar, it is a good idea to familiarize yourself with what the instrument should look like. You can take a picture of the strings or look for an image on the Internet. While it's not a complicated process, it's best to have a good idea of how the strings are positioned before you begin, and every guitar is a bit different.
Turn the pegs to loosen the strings enough to finish unwinding and removing them by hand. If you play the strings and they sound lower than normal, you are loosening them correctly. While it is possible to cut the strings to change them, this method gradually reduces the tension. Also, you can reuse the strings in case one snaps while you are putting them on.
Remove them From the Bridge: If the bridge is a normal bridge, like that of a Fender Stratocaster or other guitar whose strings are inserted into the body, just pull the strings towards the back of the body. An easier way is to push the strings through the hole where they go in to loosen them a little more and make them easier to hold. Take the piece that looks like a small metal wheel from the end of the string and carefully pull it through the hole in the guitar's body.
The strings are easily attached on most guitars, so you just have to observe how they pass through the bridge to remove them correctly.
If the strings wrap around the bridge, you can pull them from the bottom of the bridge. This type of bridge was created when some guitarists, such as ZZ Top, started wrapping the strings around the bridge to slightly increase height, eliminating the vibrations produced by the friction between the strings and the frets.
Clean Your Guitar Down: Taking the string pressure off the guitar neck is not the ideal thing for the wood. Don't take too long to complete the process and put new strings back on your guitar. Still, you have enough time to clean dust, dirt and soil off the neck of the guitar.
This way, your guitar will look better, you will protect the new strings, and you will enjoy the polished feel of the frets. If you want to clean it thoroughly, get a special fretboard cleaning product that we have talked about in other articles.
Take Your New Strings and...: Place the guitar on a flat, smooth surface that is at a comfortable height for you. Use a table as a work surface to have plenty of room to work on your guitar and do so comfortably. Be sure to place a towel or sheet underneath to prevent marking or scratching. Some people prefer to place the headstock on the edge so that it is easier to tune. I sometimes have put it, sitting down, on the armrest of my couch.
Turn the peg hole so that it points towards you. This hole should be perpendicular to the string, parallel to the frets. If you hold the guitar as if to play it, the hole should point upwards.
Pass the first string through the bridge and into the peg. Pass it through the guitar, from back to front. Generally, most guitarists start with the lowest string, low E (E). This is usually referred to as the "sixth string" or the highest gauge string (usually about 0.050). Slide it in the opposite direction from when you plucked the strings.
Then pass it through the peg hole, pulling it out. Make sure it's not too tight and leave an extra 2 to 3 inches (5 to 7.5 cm) of string. You don't want it to be too tight before you start tightening it.
The Tricky Part: Putting it through the peg, making sure it doesn't come out while you tense it, and trying to make it coil around the peg in the fanciest fashion possible. A useful trick is to hold the string on both sides of the peg and twist it so that it forms an "s". Try not to overthink it. Just grab both sides tightly and twist your hands clockwise to wrap the string around the peg. If you were to pull the string after doing so, it would look like the "S" in the Van Halen logo.
Once you have managed to do this, you should start turning the pegs counterclockwise. This way, you will start to tense the strings, to finely tune them. If your guitar goes out of tune from time to time the first hours after placing the strings, do not worry. As they are new strings, they will go out of tune a few times while they are being adjusted. Use a tuner to get the right tension. It is best not to adjust too much in doubt, as the strings may break.
Repeat the Process With all of the Strings: Don't worry about them being perfectly in tune until you have restrung them all. They won't hold the tuning perfectly at first, but don't worry about that right now. If the headstock of your guitar has 3 pegs on each side, remember that the bottom pegs are set to the opposite side than the top pegs. Simply repeat the above instructions, but interchange the terms; right to left and top to bottom.
Cut the Ends of the Strings, so you Don't Poke an Eye 0ut: Seriously. I've had some accidents this way just for being lazy. They also wave around and make a strange sound that is spooky and unpleasant. Use a wire cutter to get rid of the excess string at the end. If you wish, you can leave 1.3 cm (0.5 inches) of string at the ends to allow for a lower pitch. If you don't cut them too short, it will be easier for you to take them off and change them later on.
FAQ
Question: How Often Should you Change Guitar Strings?
Answer: Although it may depend on your climate conditions, how sweaty your hands get and how much you play, it is a good idea to change them every 3 months, or after about 100 hours of playtime. Even if you don't play your guitar and it's just hanging on the wall, the strings will still be rusting.
Question: Is it Harder to Restring an Acoustic Guitar or Electric Guitar?
Answer: They're both more or less the same. I think an acoustic is a tad more difficult because of having to take the pins out the bottom if you don't have any tools. In most electric guitars the strings just run through the body.
Question: How Much do Strings Cost?
Answer: Anywhere between 10 and 20€. I would recommend always getting a good set of strings because the difference is noticeable. Place a good set of strings on a guitar and it takes it to the next level completely, especially with acoustic guitars.
Question: Will a Music Store Restring my Guitar?
Answer: Yes, they will. But better do it yourself. Practice makes perfect, and it's something you'll have to learn properly sooner or later!
Question: What Can you do With Old Guitar Strings?
Answer: This is a more interesting question than one would think. Make sure you coil them all up together. Strings are so thin that they will poke through your rubbish bag and will constantly get in the way. I know people who make bracelets out of guitar strings- but if that's not your thing, recycle them! They are made of nickel, bronze and stainless steel.
Conclusion
Once you've put on new strings, tune your guitar often. As the strings get used to the tension, they will loosen. This happens during the first day or two. To avoid this, you can tune your guitar constantly after changing the strings.
Now that you know how to change electric guitar strings, you will be able to perform this task in a couple of minutes. Although changing electric guitar strings may seem challenging at first, this task is actually quite simple. What's more, it will only take you a few minutes to do it.
Taylor has a whole slew of experience; professional training, classical knowledge, and he’s fronted a few bands. So no matter what your long-term guitar goals are, Taylor’s been there. And he’s here to share with you the ins and outs, what to do and what to avoid, and whatever other knowledge you need to master your instrument. Every day, he spends time learning new things about the guitar; the main drive in his journey to reach all people with the power of music.
Ever hit a G chord that feels bright and settled, then swap to G7, and suddenly it sounds a little…expectant? Like it’s leaning forward, waiting for the next page to turn. That “unsettled” sound is the whole point. G7 is a dominant seventh chord built from G (Root), B (Major 3rd), D (Perfect 5th), and […]
The first time I met B7, my hand froze. Four fingers, tight spacing, and one tiny mistake makes half the chord go dull. That is why I call B7 the Gateway Chord. It pushes your fingers to work as a team. You will hear it in Blues, Folk, Classic Rock, Jazz, and even acoustic metal […]
Hitting that beginner plateau on guitar can feel rough; you sit down to play, pick a song you love, and realize it is way beyond your current skills. That kind of mismatch drains motivation fast. The smarter move is to start with songs that sound great but use simple building blocks like open chords, standard […]