Is your electric guitar feeling more like a battle than a smooth-playing instrument? If pressing down the strings takes more effort than it should, or your fingers are tiring out quickly, you might have high action.
When the strings sit too far from the fretboard, it can make playing uncomfortable and slow down your speed.
But, before you grab a wrench and start cranking things down, there’s a right way to lower the action without causing buzzing, intonation issues, or long-term damage.
This guide walks you through how to safely adjust your guitar’s action step by step.
The Guitar’s Setup Overview
Before jumping into adjustments, it’s important to understand how a guitar’s setup affects playability. Three main things control string height:
Neck Relief
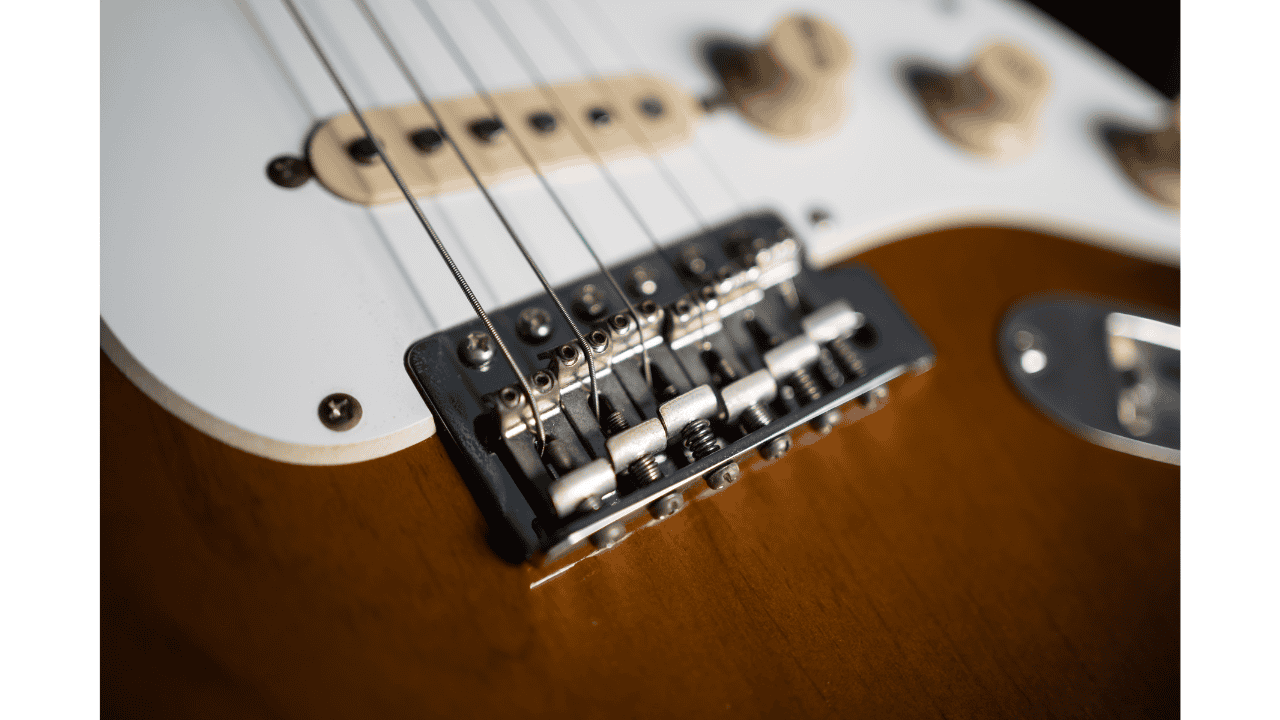
Image from Sweetwater
Neck relief refers to the slight forward bow in a guitar’s neck, which allows strings to vibrate freely without buzzing against the frets.
A completely straight neck might seem ideal, but in reality, a slight curve is necessary for clean notes and smooth fretting.
You can check neck relief using a straight edge or feeler gauge. Another simple method is:
Press down on the first fret with one hand.
With your other hand, press the 15th fret of the low E string.
Look at the gap between the string and the 7th or 8th fret.
The ideal gap (relief) is about 0.008 to 0.010 inches—just enough for a thin feeler gauge to slide under.
If the gap is too big, the truss rod needs slightly tightening (clockwise turn).
If the string touches the fret, the truss rod needs loosening (counterclockwise turn).
Since truss rod adjustments affect the entire neck, small turns (no more than ⅛ of a turn at a time) are recommended.
Saddle Height
Saddle height plays a major role in string action, determining how high the strings sit above the frets. Lowering the saddles makes playing easier, but going too low can cause fret buzz. The adjustment method depends on the type of bridge your guitar has.
On Stratocaster-style bridges, each saddle has two screws adjusted with an Allen wrench. Changes should be small and even to maintain the fretboard’s natural curvature.
Tune-o-Matic bridges, found on Gibson-style guitars, use thumbwheels to raise or lower the entire bridge. The bass side is usually set slightly higher than the treble side for better balance.
For Floyd Rose and floating tremolo systems, lowering the action also affects tuning stability and tremolo balance. Adjustments should be made gradually to avoid throwing off intonation.
A good action height at the 12th fret is 4/64" (1.6mm) on the low E string and 3/64" (1.2mm) on the high E string, with the treble side slightly lower on Tune-o-Matic bridges. Making small, careful adjustments ensures a comfortable feel without introducing buzzing.
Nut Height
The nut plays a major role in how easy or difficult your guitar is to play, especially in open-position chords. If the nut slots are too high, fretting near the first few frets feels stiff and requires excessive force. If they’re too low, open strings may buzz.
To Check Nut Height:
Press down on the third fret of any string.
Look at the gap between the string and the first fret.
There should be a small gap—just enough for a thin piece of paper to fit through.
If the string touches the first fret, the nut is too low. If the gap is too large, playing open chords will feel difficult.
Since filing nut slots is permanent, this adjustment is usually best left to a professional. A poorly cut nut can cause tuning instability, unwanted buzzing, or even require a complete replacement.
Tools You’ll Need to Lower Action on an Electric Guitar
Before making adjustments, gather these:
Allen wrenches (commonly 1.5mm to 2.5mm for saddles)
Screwdrivers (for bridges with adjustment screws)
Feeler gauges (optional, for precise neck relief checks)
Ruler (for measuring string height at the 12th fret)
Step-by-Step Guide to Lower the Action on an Electric Guitar
Lowering action is a process and doing it too quickly can lead to fret buzz or tuning instability. Follow these steps carefully.
Adjustment Process
Each step should be done in order, with small, gradual changes. Rushing adjustments can lead to new problems, so take your time and check the results as you go.
1. Tune the Guitar First
Always start by tuning your guitar to the standard pitch. String tension affects the neck, so any changes to action should be made while the guitar is properly tuned.
2. Check and Adjust Neck Relief
Press down on the first fret and 15th fret of the low E string, then check the gap at the 7th or 8th fret.
If the gap is too big, tighten the truss rod slightly.
If the string touches the frets, loosen the truss rod a little.
Adjust in small increments (⅛ of a turn at a time) and let the neck settle before checking again.
3. Adjust the Bridge
This is where you lower the action to your preferred height. The process depends on your bridge type:
Strat-style bridges: Use an Allen wrench to lower each saddle evenly.
Tune-o-Matic bridges: Turn the thumbwheels to adjust the overall height.
Floyd Rose or tremolo systems: Lower the bridge height carefully and adjust the tremolo springs if needed.
Make small adjustments, checking for buzzing and discomfort after each change.
4. Measure Action and Retune
Use a ruler at the 12th fret to check string height:
Low E:4/64" (1.6mm)
High E:3/64" (1.2mm)
Retune after every change and recheck measurements until the action feels comfortable.
5. Check Pickup Height
Lowering the action also changes the distance between the pickups and strings. If the pickups are too close, they may pull on the strings and affect sustain.
Press the last fret and check the gap between the pole piece and the string.
Adjust pickups to maintain a balanced tone without excessive magnetic pull.
Identify and Fix Buzzing
Buzzing can happen if the action is too low, the neck isn’t properly adjusted, or there are uneven frets. Common causes include:
Buzzing everywhere: The action is too low or the neck is too straight.
Buzzing on one string: The saddle may be too low or uneven.
Buzzing in certain areas: Check for high frets or improper neck relief.
Try raising the affected saddle slightly or rechecking the truss rod adjustment to eliminate unwanted buzz.
Intonation Check After Adjustments
Lowering action can affect intonation, making the guitar sound out of tune higher up the neck. To check:
Play the 12th fret harmonic and compare it to the fretted 12th fret note.
If the fretted note is sharp, move the saddle back slightly.
If the fretted note is flat, move the saddle forward.
Fine-tuning intonation ensures that your guitar plays in tune across the entire fretboard.
Advanced Tips and Considerations
Lowering action affects more than just playability—it also impacts tone, durability, and long-term stability. Keeping these factors in mind will help you get the best results.
Playing Style and Tone
Your playing style influences how low your action should be. Heavy-handed players or slide guitarists may need higher action to avoid buzzing while lighter players can use a lower setup for smoother playability.
Lower action makes fast playing easier but can reduce sustain. Slightly higher action allows strings to vibrate more freely, improving tone and clarity. Finding the right balance depends on your technique and sound preference.
Environmental Factors
Wood reacts to temperature and humidity, which can change neck relief and action.
High humidity: The neck bows forward, raising action.
Dry conditions: The neck backbows, lowering action and causing buzzing.
Regular checks help prevent long-term issues. Using a humidifier in dry months and a dehumidifier in humid climates can keep your guitar stable.
Advanced Buzzing Issues
If buzzing persists, the issue may not be action-related. Uneven frets can cause isolated buzzing, requiring a fret level and crown to fix.
Nut height also affects playability. If slots are too deep, open strings may buzz; if too high, fretting near the nut feels stiff. Since nut adjustments are permanent, professional help is recommended.
Tool Usage Best Practices
Using the right tools prevents damage. Incorrect wrenches or screwdrivers can strip screws or crack the neck. Always make adjustments in small increments and test frequently.
Rushing changes can create bigger problems, so patience and precision are key to getting the best action possible.
Maintenance and Professional Help
A well-maintained guitar stays easier to play. Here’s how to keep your action stable:
Regular Guitar Checkups
Routine checks help catch small issues before they become bigger problems. At least every few months, inspect your neck relief, saddle height, and overall action.
If the action suddenly feels different, check for changes in humidity, worn-out strings, or neck movement. Keeping an eye on these factors will help your guitar play consistently well.
Proper Storage
Where and how you store your guitar affects its long-term condition. Extreme temperatures and humidity shifts can cause the neck to warp or the action to change. Avoid leaning your guitar against walls or leaving it in direct sunlight.
When not in use, store it in a case or on a stand in a stable environment to prevent unwanted neck shifts.
When to Seek Professional Setup
Some adjustments require experience and specialized tools. If you’re dealing with nut height issues, fret leveling, or complex truss rod problems, it’s best to visit a guitar technician.
Cutting nut slots too low, filing frets unevenly, or over-adjusting the truss rod can cause permanent damage.
If you’re unsure about a setup change or are experiencing persistent buzzing, poor intonation, or other playability issues, getting a professional setup can save you time and frustration.
A well-set-up guitar feels and sounds better, making it worth the investment.
Conclusion
Lowering the action on an electric guitar can make a huge difference in playability, but it takes careful adjustments to avoid issues. Start with the truss rod, then move to the bridge saddles, check for buzzing, and finish with an intonation check.
Small changes are key—rushing the process can lead to more problems than it solves.
If you want to make sure your guitar feels perfect, experimenting with action settings will help you find what works best for your style. And, if anything seems off, don’t be afraid to reach out to a guitar tech for guidance.
Author
Altin Gjoni
Altin lives for guitar; grabbing his beloved guitar is one of the first things he does when he hops out of bed in the morning. But, he isn't just dedicated to continuing to grow as a musician himself. Instead, he wants to help other people flourish playing the guitar too. It always makes Altin sad when he sees musicians with potential give up on playing because they get frustrated. After watching one too many people put down their guitar forever, he's now dedicated himself to helping every beginner guitarist he can learn how to master their struggles.
Best Articles:
Cheap Guitars That Are Better Than You Think
https://guitarspace.org/acoustic-guitars/cheap-guitars-that-are-better-than-you-think/
Fender Mexican Standard Review
https://guitarspace.org/electric-guitars/fender-mexican-standard-review/
Ever hit a G chord that feels bright and settled, then swap to G7, and suddenly it sounds a little…expectant? Like it’s leaning forward, waiting for the next page to turn. That “unsettled” sound is the whole point. G7 is a dominant seventh chord built from G (Root), B (Major 3rd), D (Perfect 5th), and […]
The first time I met B7, my hand froze. Four fingers, tight spacing, and one tiny mistake makes half the chord go dull. That is why I call B7 the Gateway Chord. It pushes your fingers to work as a team. You will hear it in Blues, Folk, Classic Rock, Jazz, and even acoustic metal […]
Hitting that beginner plateau on guitar can feel rough; you sit down to play, pick a song you love, and realize it is way beyond your current skills. That kind of mismatch drains motivation fast. The smarter move is to start with songs that sound great but use simple building blocks like open chords, standard […]