Want to change up your playing style- lean into some rock and blues, but don’t want to commit to hours of new learning? Changing up your tuning is a simple, yet effective way to change up your playing style, and lean into new genres.
B Standard Tuning, short for Baritone turning, involves tuning down your guitar, by a perfect fourth. It is commonly used in metal, hard rock, as well as certain doom genres and blues.
In this guide, we will take you through B Standard Tuning. We’ll discuss how to set up your guitar, as well as other things you should think about when switching things up. We’ll cover string gauges, truss rod adjustment, intonation, and pickup height. But don’t worry, it's all easier than you think!
Let's get into it!
What is B Standard Tuning?
B Standard Tuning, also called Baritone tuning, is a tuning technique where every string is tuned down a perfect fourth, or 5 semitones down from the standard E tuning.
e |---------------------- B (1st string – highest)
B |---------------------- F♯ (2nd string)
G |---------------------- D (3rd string)
D |---------------------- A (4th string)
A |---------------------- E (5th string)
E |---------------------- B (6th string – lowest)
Because the intervallic structure of B standard tuning is the same as standard E tuning, the relationships between the string’s notes remain unchanged, making any chords and other melodies interchangeable.
What this means for you is that anything you play on your standard E tuned guitar, you can play exactly the same way on the B standard tuned guitar. Additionally, the B Standard tuning on a standard 6-string guitar is the same as on a 7-string guitar, without the high E string. This makes it a good transitional step, when working towards playing on a 7-string guitar.
Benefits of B Standard Tuning:
Heavier, thicker sounds that are more powerful, and ideal for genres such as metal
Easier execution of power chords and riffs due to the reduced string tension
New possibilities for soloing and chord voicings with fuller sounds
Access to lower notes without the need for a baritone, or 7-string guitar
Smoother transition to 7-string guitar playing
Improved matching to certain vocal ranges
Choosing the Right Strings
Importance of String Gauge
The lower tuning used in the B standard tuning lowers the string tension, compared to regular E standard tuning. The lower string tension means that the strings can feel ‘floppy’, and are more difficult to play.
Switching to heavier gauge, or thicker strings, accounts for this lowered tension, and restores the normal string feel. It also avoids buzzing and can improve the sound quality.
Finding the Optimal Gauge
The easiest place to start when searching for the optimal gauge is by sticking to your current gauge set, but swapping out the low E string to a heavier gauge. For example, ff you normally use .010–.046 try switching to .011–.052 or .012–.056.
Although finding the perfect gauged string is ultimately up to personal preference, there are some useful tools, such as online string tension calculators, that can simplify the process, and give you some guidance.
For example, when I play my Yamaha Revstar in B Standard tuning, I usually put on a .012–.060 set. I find that this helps to maintain the string feel with lower tuning, and keeps that nice clarity in the lower notes.
Adjusting the Nut:
When playing with a B standard tuning, the nut may need to be adjusted. Because nuts are typically cut for thinner strings, the larger gauge strings may require some adjustments to be made to the nut.
Adjusting the nut is necessary to not only fit in the larger strings, but also to avoid buzzing, or string snapping.
In order to safely widen nut slots, it is important to use a nut file set that is matched for your new string gauge. Using the file to slowly file down the grooves along the string path, as well as polishing and lubricating the slots are the best ways to safely broaden these grooves, and fit in the larger gauge strings.
Setting Up Your Guitar
Setting up your guitar properly is important when it comes to getting the most out of your new guitar tuning. Whilst these adjustments are relatively simple, they are key in ensuring the playability and sound quality involved with B Standard tuning.
Truss Rod Adjustment
The truss is a metal rod that runs through the neck of your guitar and helps to counterbalance the tension contained in the strings. When you change your guitar strings, the tension changes, and therefore the neck may start to bend, meaning your truss rod will need to be adjusted accordingly.
When doing this, it is important to be careful, and seek help if you are not confident.
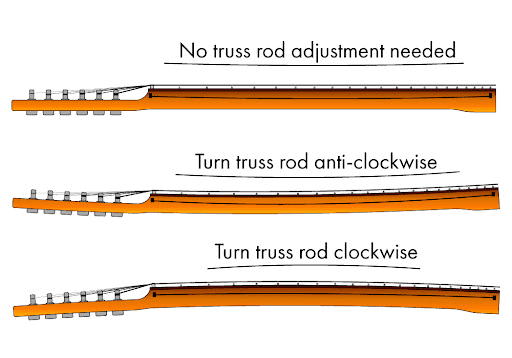
If you have some experience with this, or want to give it a try anyway, the first step is to identify if your guitar needs the truss rod to be turned clockwise to tighten, or anticlockwise to loosen it.
This diagram will give you a good guide:
The best way to adjust the truss rod is by making small adjustments, ⅛ of a turn at the time, and letting the neck settle, before adjusting it again.
Steps To Adjust Your Truss Rod:
Locate the access to the truss rod on your guitar. In some cases, it is on your headstock, whilst in others it is found close to the body at the end of the neck. In some cases, you may have to unscrew the entire neck first.
Take your truss rod tool. Some guitars use standard Allen hex wrenches in various sizes, while others might use different tools generally included with the guitar when sold.
Loosen your strings.
Insert your truss rod tool and slowly turn it clockwise. Try to make minimal adjustments (roughly ⅛ of a complete turn at a time), then tune your guitar and let it settle for a few minutes.
Press your low B string on fret 1 (with your left hand) and between frets 15-17 (with your right hand) simultaneously. This will make the string act as a straight line. Use it to compare it to the arch of your neck and check if you solved the problem.
Repeat steps 3, 4, and 5 if needed.
Action Adjustment
Action describes how high the strings sit above the frets. It has important influences on playability, as well as sound. Both low and high action have consequences on both.
The lower string tension involved in B standard tuning may require action adjustment, as the strings may become closer to the frets, risking buzzing and other sound distortion.
In general, whilst lower action can make fretting feel easier, you’ll likely have some strings that buzz. On the other hand, higher action will have little risk of buzzing, but will make fretting quite a bit more difficult, since the strings are further away from the fretboard. It is important to adjust the action to get this balance just right.
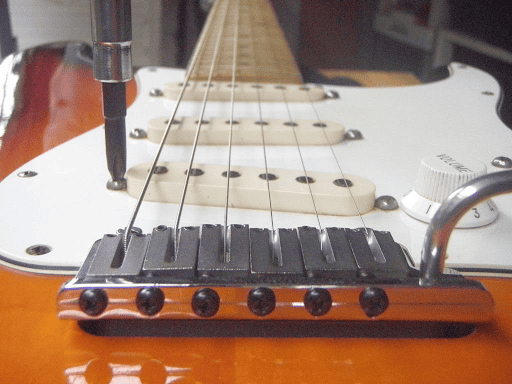
On Tune-o-Matic Bridges, the two screws on either side of the bridge posts will need to be turned in order to adjust the action
On Fender-Style Bridges each individual string saddle will have two small height screws which will need to be adjusted by turning either clockwise or anticlockwise
Intonation Adjustment
Intonation describes how in tune your guitar is throughout the fretboard, no matter where you play on the guitar. Intonation is important as it affects both the sound of notes themselves, and whole chords, especially higher up on the neck.
Changing to B standard tuning can be tricky when it comes to intonation, as the heavier strings can really impact it. That is because a guitar with a scale length between 24.5 and 25.5 inches is not designed for this tuning, and will struggle to achieve perfect intonation when played both with much larger strings and tuned a perfect fourth lower.
However, making some adjustments to intonation will help achieve a much better sound regardless.
How To Adjust Intonation:
Adjusting the intonation involves tweaking your bridge as we did with the action.
If you are dealing with a Tune-O-Matic bridge, you will find six individual intonation screws opposite your bridge pickup. On a Fender-style Bridge, you’ll be presented with the same scenario, but (on vintage guitars) you might find only three screws in total, so one for two strings.
After tuning your guitar play the open low B string, then play the same note an octave higher (so 12th fret on the same string).
Look at your tuner and check if the fretted note is higher or lower in pitch than the open string.
If higher than you need to move back the saddle, further away from the neck. Do the opposite if the pitch is lower.
Tune-up and check again (open string and 12th fret). If there still is a noticeable difference, repeat the process.
Pickup Height Adjustment
Pickup height describes the height of the guitar strings from its magnetic pickups. This distance has a huge impact on both the tone, and the volume. Whilst there is no ‘right’ pickup height, it is important to find your perfect balance between too high, and too low, especially when adjusting for B standard tuning.
Using thicker strings, as you may need to do in B standard tuning, may make the strings too close to the pickups. This can result in less clarity and definition in your sound.
How to Adjust Pickup Height
Turn the screws either side of the pick up, either clockwise to raise the pickup height, or counterclockwise to lower the pick up. I often find this takes some trial and error to get right. Patience is key!
Tips and Considerations
Guitar Choice
Whilst most guitars are able to play B standard tuning, there are some guitar choices that are better than others for this kind of tuning, if you are committing to this new style of playing.
26.5 inch, or 27 inch baritone guitar: The right scale length: 26.5 inch, or 27 inch baritone guitar, will offer better string tension and intonation, when compared to other guitars. This will help with the lower notes, as well as the new strings to avoid floppiness.
Strong Truss Rod: A guitar with a strong neck will help to support the changing tensions with thicker strings used in B standard tuning.
Fixed Bridge: A hardtail or string-through-body bridge will be more stable and have better intonation
Experimentation
When it comes to changing the tuning, the best thing to do is to play around a bit with your guitar. This may involve experimenting with different string gauges, action heights, and pickup heights in order to find your perfect fit. Unfortunately there is no one size fits all.
B Standard tuning opens up a world of possibilities and new sounds. Once your guitar is set up it's a great time to experiment with new genres, and try out some great new riffs.
Seeking Professional Help
Making adjustments on your guitar can be daunting, especially if you have never played around with screwing and unscrewing various bits of your guitar. If you have some doubts with making various adjuvants, it's best to consult a luthier, or an experienced friend, to get some help.
Exploring B Standard in Different Genres
Metal
B Standard Tuning is commonly used in metal and helps to nail the sounds needed in heavy riffs and classic down-tunes songs. Its heavier, more menacing sounds make it a staple in various metal genres.
Beyond Metal
Whilst B standard tuning is commonly used throughout metal genres, it is not exclusively used in metal. It is commonly also used in blues, as well as ambient music in general, for its ability to develop deep textures and emotional sounds.
B standard tuning has been used famously by the likes of Ariel Posen and Joey Landreth.
Conclusion
B standard tuning opens up a world of opportunity to play new genres, change things up and get creative. What's so great about B standard tuning is that you can play chords and notes you're familiar with, thanks to its similarities to E standard tuning.
Whilst B standard tuning is quite simple in itself, the above steps are required for many guitars in order to maximise the sound created in B standard tuning. Some simple things you can do to get the most out of B standard tuning such as choosing the right strings, adjusting the nut and truss rod adjustment, for example.
Ever play around with B standard tuning? Drop a comment and let me know how you found it, what genres you played or any particular adjustments you made on your guitar that you found helpful.
Author
Pietro Venza
Pietro fell in love with the guitar at a young age and has been hooked ever since. He started gigging when he was 14 years old and hasn’t yet put his guitar down. In 2018, he was nominated for a Presidential Scholarship at Berklee College of Music, which means he was in the top 25 musicians from across the world auditioning. He also has a Bachelor’s and a Master’s Degree in Jazz & Pop Guitar Performance from Saint Louis College of Music in Rome, he was also promoted to the teacher of his fellow students there.
Since 2019, he’s been the guitarist for Dolcenera. He’s toured around Italy playing at some prestigious venues including Teatro Brancaccio (Jimi Hendrix played there!) and the Verona Arena (Brian May, Pink Floyd and Springsteen played there!). He’s also composed music for a show that’s still airing every now and then on Italian TV.
Ever hit a G chord that feels bright and settled, then swap to G7, and suddenly it sounds a little…expectant? Like it’s leaning forward, waiting for the next page to turn. That “unsettled” sound is the whole point. G7 is a dominant seventh chord built from G (Root), B (Major 3rd), D (Perfect 5th), and […]
The first time I met B7, my hand froze. Four fingers, tight spacing, and one tiny mistake makes half the chord go dull. That is why I call B7 the Gateway Chord. It pushes your fingers to work as a team. You will hear it in Blues, Folk, Classic Rock, Jazz, and even acoustic metal […]
Hitting that beginner plateau on guitar can feel rough; you sit down to play, pick a song you love, and realize it is way beyond your current skills. That kind of mismatch drains motivation fast. The smarter move is to start with songs that sound great but use simple building blocks like open chords, standard […]