Two Notes Torpedo CAB M+ Review: The Ultimate Cabinet Simulator?
Ed Lozano
Mid-2021, I was asked to lay down some guitar parts by a guitarist/producer on the local scene. He's one of the better guitarists on the scene, so I was surprised when he asked me to come to his studio.
We spoke about what he was looking for, and I did a quick takedown of the chord progression and started warming up while thinking about some ideas for this recording. He mentioned that he had the concept for the guitar sound, so I didn't pay any mind to it. Well, just a little.
I had some minor concerns because he had his studio outfitted with high-gain amps and gear suited for harder music styles that I'm not that comfortable playing. But, he said, "For you, I have this preamp pedal in mind and some speaker IRs that we can try. I know you're a fan of the edge-of-breakup tone, and I need some of your bluesy phrasing for this track."
I was immediately at ease until I saw a preamp pedal and the Torpedo CAB M+. I looked at him and asked, "That's it?" He nodded, "Yeah, that's it. I'll add compression, EQ, and reverb in post, maybe a little delay, if you'd like. But that's it."
I began tweaking the preamp pedal, and then we started working through the Torpedo CAB M+, and, to my surprise, it was easy to tweak using the two control knobs and pedal display.
What was the result?
The recording was a success, and I talked him into selling his Torpedo CAB M+ (you can find them new for around $250, but most sell them for $299). Today, I have two (the first one I bought used for $200, and the second one, I purchased new for $250).
In this article, I'll briefly cover the features, specs, etc. Instead, I'll share with you how I use the Torpedo CAB M+ and how it might enhance your guitar-playing experience. Especially those of you who want to go ampless.
Two Notes Torpedo Review: Bottom Line Up Front
I was introduced to the Torpedo CAB M+ as a guitar cabinet simulator, but it's much more than that. I'll explain cab sims, IRs, and other related lingo below.
The Torpedo includes simulators for a typical guitar amplifier's preamp and power amp stages, plus tweakable microphone simulators. There are guitar and bass cabinet simulators, but it doesn't end there. The Torpedo also adds reverb, EQ, and tone shaping. All tweakable, and I'll explain all this below.
The bottom line is that I'm a fan. It's the pedal platform I've been looking for that I didn't know I was looking for.
Since the studio experience in the opening story, I have purchased two Torpedos and have abandoned the use of multi-effects pedal boards (bye-bye Headrush, Line 6, Fractal, et al.) and embraced the beloved stompboxes of my youth.
This is perfect for those who want to go ampless when playing live or recording guitars in your home studio without bothering the neighbors. Below I'll handle the geeky stuff and provide more details on how I use the Torpedo.
What’s a Torpedo CAB M+ and Why Should I Care?
The Torpedo CAB M+ is a stompbox developed by the good folks at Two Notes, and they have some other exciting products. But we'll focus on this guitar amp simulator and cabinet modeler.
I said it's a stompbox, but there's no stomp function. The reason being is that it's an always-on pedal. The Torpedo is the portable version of the Two Notes Engineering studio gear.
But what is it exactly?
The Two Notes' website describes it best as "the missing link between a guitarist's or bassist's own rig and either a live-sound console/PA system or, when in the studio, an audio interface or recorder. In other words, it's essentially a compact, pedalboard-friendly version of their more established Torpedo hardware."
Sounds good, but why should I care?
Because it sounds incredible. It takes the "suck" out of your tone by providing subtle alternatives that help you shape your sound.
The Torpedo is an amp-miking alternative, and Two Notes doesn't develop anything mediocre. There's a lot of R&D, attention to detail, and performance packed into this little box.
How It Works
The pedal can be tweaked using the two scroll-select knobs on the face of the pedal and the most-unattractive feature of the unit, the display.
The Left Button
The left knob allows you to scroll from one preset to the next.
When you push the left knob, you go into the parameters of that preset.
Depress it again to exit the parameter section.
You can also use the left knob to scroll through the parameter section to select the "mode" you want to tweak.
The Right Button
Allows you to adjust the pedal's volume—very handy for live use.
When the left knob selects the parameter section, you can depress the right knob to enter that "mode" to tweak. This works for turning modes off and on or making quick adjustments.
Depress and hold for a few seconds, and you can activate the "tuner." Yes, it has an onboard tuner.
My experience was fooling around with it until I learned how each knob works. It didn't take long for me to get comfortable with it. And I'm usually a little leery at diving into the pool's deep end immediately.
Lingo, Jargon, Slang, or Terms You Should Know
These are not textbook scientific definitions. Instead, they're what I call working definitions. Many of you may already have a deeper understanding of the science behind sims and IRs. These are simplified versions to help those new to these terms follow along.
Simulator: These are digital models of physical gear. The Torpedo simulates the preamp and power stage of amps, guitar and bass cabinets, and microphones. They are referred to as "sims" for short.
IR: These are Impulse Responses, and IRs are short samples. These short samples are measured and analyzed to see how they react to outside forces. For example, adding distortion to a speaker, moving a microphone from the capsule to the cone's edge, or changing the angle. These elements affect how the sound behaves, and algorithms are developed to replicate that behavior.
DynIR: Dynamic Impulse Responses are more complex than simple IRs. Simple cabinet IRs replicate how the speaker behaves to the signal passing through it. Dynamic IRs demonstrate how the environment also affects the signal and the cabinet.
The Parameters (or Modes)
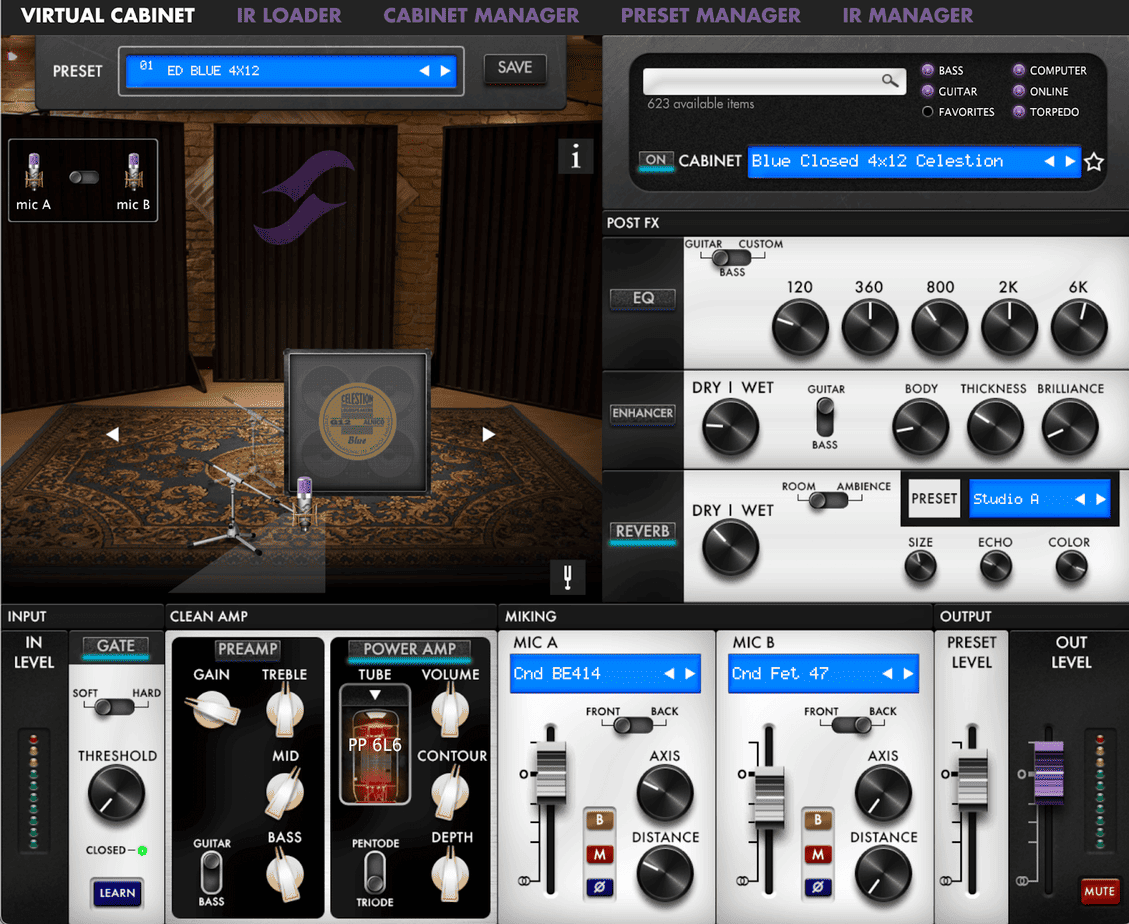
These can be adjusted directly from the pedal or the app. The Remote app can be downloaded on your cell phone, tablet, and/or desktop. These images are from the desktop, and the Torpedo is easier to tweak from the desktop app.
Although, making adjustments from the pedal is not as cumbersome as I initially thought and is perfect for a quick onstage adjustment.
Mode 1: Virtual Cabinet or IR Loader
You can load your third-party IRs. I did this, and it worked okay. But, when I loaded the DynIRs specifically made for the Two Notes products, my eyes went wide, and my jaw dropped in amazement. The Virtual Cabinet is the way to go.
Mode 2: Noise Gate
This is a simple noise gate with an intuitive "learning" feature. If you've got some light humming or buzzing (analog pedals will cause this), turn on the learning feature, and the pedal will automatically set the threshold and noise reduction. I don't play that distorted, so I basically keep this off.
Mode 3: Preamp
There's a clean preamp that is somewhat limited, and it's a nice in-case-of-emergency feature. It may have been included for completeness, but most of us will bypass this feature and use our preamp pedals.
Mode 4: Power Amp
This is one of my favorite features and offers tweakability in volume, presence, and depth controls. But the authentic secret sauce is the ability to choose the power tube models. There are four: 6L6, EL34, EL84, and KT88 in four permutations that can be further customized by choosing single-ended or push-pull with triode or pentode operation.
Mode 5: Miking
This is a powerful feature. The ability to choose one of eight microphone models while adjusting the volume, angle, and distance. This is where I spend most of my time when the sound "is just not quite there yet."
You can also use two different mic models, e.g., one for close miking and the other for ambient miking, or one in front and one in the back.
You can click, hold, and drag the mic into position on the desktop app. The cellphone and tablet apps can be frustrating for these types of adjustments.
Mode 6: EQ
There's an onboard 6-band EQ that can also be switched for bass frequencies or parametric settings. This is an excellent option when the venue has low ceilings or all hard surfaces. I haven't needed to use it just yet. But it's nice to know it's there if I need it.
Mode 7: Enhancer
This provides three parameters: body, thickness, and brilliance. I usually don't use it, but it works well with the preamp. You can also mix the amount of wet/dry.
Mode 8: Reverb
There are 12 room choices and three parameters (size, echo, and color). You can also choose between two reverb types (room or ambient) and the amount of wet/dry mix. Not the sexiest reverb in the world and not the worst, but great in a pinch, and I've used it in a live situation.
Mode 9: Level
This allows you to adjust the preset level, which I usually put at -2dB as a precaution. There's also an output level.
Mode 10: Save
Let's say you're on the bandstand and take the time to make some adjustments that you'd like to keep. Just click the "Save" mode. You can save and rename to a different preset location or overwrite the preset on the pedal. But if you want to back up the settings to your master backup, you'll have to connect the pedal to the computer.
Mode 11: Tuner
Also not the sexiest looking tuner function. Make sure you turn off all of your effects, or the tuner won't function accurately. But it'll save you when you need it most. Also, stomp and hold the right knob for a few seconds to enable the tuner.
Mode 12: Global
This sets the Aux Out level and Mute or Unmute function. There are also parameters for latency, screen brightness, memory card, etc. I never go into these. Honestly, I just did it to see what's there for this article. It's stuff that makes my head hurt.
How I Use the Torpedo
Ampless Rig for Live Use
For Small Venues: I use it at the end of my pedalboard and as a Direct Box to the Console. In some cases, I have a monitor mix to hear myself. I can listen to myself through the mains in my weekly hotel gig.
For Large Venues: I have two torpedos that I send to front of house, and I use different amp combinations depending on the music style. For example, I'll combine the Celestion Blue Dyn IRs (warm sounding) with the Celestion Copper back IRs (a little brighter). I'll also mix 4 x 12 with 1 x 12 open cabinets. I'll do this during sound check and, using my wireless system, stand in front of the stage to listen to the results. My goal is to have a big, clear guitar sound.
Home and Studio Use
Home: I use it the same as for a small venue. My pedalboard is not large. I only use what's absolutely necessary. I plug the Torpedo into an FRFR and use it for home practice and small band rehearsals. The Torpedo has an Aux In and Headphone Out that I can use for late-night practice.
Studio: The same as the large venue. I use both Torpedos and run the rig in stereo. Sometimes the producer prefers that I record a dry signal that they can reamp if necessary. I don't mind this because I can record with my sound and add the emotion and texture that I'm hearing in real-time rather than trying to add inflections to an imagined sound.
Alternatives
There isn't an exact alternative to the Torpedo that I'm aware of. But the following devices offer some of the features that we discussed here. It depends on your needs and which device works best for you.
Multi-Effects Amp Modeler with added capabilities)
UI is easily accessible, especially using the free Mac OS/Windows Remote software.
Same sound quality as the larger Torpedo units.
Can import third-party IRs. Although the DynIRs are worth the additional investment.
Cons
Mic placement is wonky on the cellphone and tablet.
Conclusion
I moved to the Andes mountains about 10 years ago and didn't imagine needing a more portable system than I had used in New York City. But here, parking is worse, and the stages are smaller. On the plus side, the audiences are more attentive and appreciative. And the cost of living allows for a dignified quality of life.
I loved my tube amps in the past, but the lack of portability and maintenance issues have sidelined them. So, I switched to the portable multi-effects pedalboards that offer tons of amps and effects, but I still feel like I'm compromising my sound.
It wasn't until I used the Torpedo in the studio that I felt I could put together a small but powerful pedalboard without compromising tone. Now I have. And I'm in the process of narrowing down my pedal choices. So, stay tuned for my Tonal Journey Update.
If anything I've shared in this article resonates with you, I suggest you give the Torpedo a try, and I implore you to try it with DynIRs. It might be the missing piece of the puzzle.
Thanks for reading.
Author
Ed Lozano
"I’m amazed that I still enjoy sitting with a piece of sheet music and learning something new after all of these years.”
Ed Lozano is a professional guitarist, instructor and author. He earned a B.F.A. in Commercial Arranging/Professional Writing from Boston’s Berklee College of Music. Ed has worked with Bob Dylan, Paul Simon, Tori Amos, Stone Temple Pilots, ACDC, and many others.
Ever hit a G chord that feels bright and settled, then swap to G7, and suddenly it sounds a little…expectant? Like it’s leaning forward, waiting for the next page to turn. That “unsettled” sound is the whole point. G7 is a dominant seventh chord built from G (Root), B (Major 3rd), D (Perfect 5th), and […]
The first time I met B7, my hand froze. Four fingers, tight spacing, and one tiny mistake makes half the chord go dull. That is why I call B7 the Gateway Chord. It pushes your fingers to work as a team. You will hear it in Blues, Folk, Classic Rock, Jazz, and even acoustic metal […]
Hitting that beginner plateau on guitar can feel rough; you sit down to play, pick a song you love, and realize it is way beyond your current skills. That kind of mismatch drains motivation fast. The smarter move is to start with songs that sound great but use simple building blocks like open chords, standard […]