G Major Guitar Scale Guide: Everything You Need to Know
Gustavo Pereira
In music, scales are frequently regarded as the foundation for melodies and improvisation, so you can expect to come across them very early on if you decide to deepen your understanding of music theory. This G Major Guitar Scale Guide is going to teach you about the G Major scale on the guitar. You will learn the most important theory and also how to apply it on the guitar, which should be your main objective.
While practicing scales repeatedly for hours is not the most pleasurable thing to do on the guitar, you should certainly invest a fair share of your time in them, as it will improve your musical proficiency significantly.
Having a clear understanding of how scales work and how they relate to the chord progression of a song can take your playing to the next level very quickly. When you are aware of all the options you have in a given moment, you become a much better improviser, composer, and musician in general. This is one of the abilities that separate professional players from the rest.
You will find scale and chord diagrams, as well as different fingering patterns and their corresponding tabs.
Lastly, keep in mind that the scale shapes in this guide also work on the rest of the major scales after they are transposed by moving them up or down on the guitar's neck.
The G Major Guitar Scale - Notes and General Knowledge
Like all the other major scales, the G Major scale follows a "formula" in regards to the intervals that exist between each scale degree.
The major scale, regardless of the key center, is always structured like this:
W; W; H; W; W; W; H.
(W=whole tone; H=semitone)
In summary, this means that each note is one whole tone (two semitones) away from the next note, except for the interval between the 3rd and 4th degree, and afterward, between the 7th and the 1st degree of the scale.
You can also represent major scales numerically as "1, 2, 3, 4, 5, 6, 7", meaning that all intervals are major (second, third, sixth, and seventh) or perfect (fourths and fifths).
By applying this rationale to the key of G Major, we get the following scale:
G (Root)
A (Major Second)
B (Major Third)
C (Perfect Fourth)
D (Perfect Fifth)
E (Major Sixth)
F# (Major Seventh)
As you can verify, all notes are separated by one whole tone, except for B/C and F#/G (3rd/4th and 7th/1st degrees).
This is how the G Major scale looks like when written on a staff:
The G Major Guitar scale is one of the simplest scales to read since it only has one sharp, which is F.
The Circle of Fifths is a great tool that helps you understand how key centers work and relate to one another more visually. Check below for an example:
You will find all keys around this circle, as well as whatever sharps or flats they have.
You start at the top, in C Major, which has no accidentals (sharps or flats).
You move in a clockwise direction, and each time you move, you go up a perfect fifth and add one sharp to the key signature.
There is a perfect fifth interval between C and G, G and D, and so on.
Each time you add a sharp, you must do it in a specific order:
F, C, G, D, A, E, B
In the case of G Major, since you only move one spot, you only have one accidental, F#.
This way, all scale degrees follow the same formula that was described at the beginning of this section.
Lastly, regarding the Circle of Fifths, if you move counterclockwise, you add one flat each time instead. These also follow a specific order:
B, E, A, D, G, C, F
The G Major Scale and its Relative Minor Scale: E Minor
The Circle of Fifths also gives us another important detail about each major key, which is their relative minor key.
These are the keys on the inner side of the circle. If you look at G Major, you can see that its relative minor scale is E minor.
Each major scale has a relative minor scale, with which they share the same notes but around a different key center.
The relative minor of a major scale can be found one major sixth above it (9 semitones) or one minor third (3 semitones) lower.
This is because the natural minor scale is built upon the 6th degree of a major scale (E is the major sixth of G).
This information means that the E minor scale has the following set of notes:
E (Root)
F# (Major Second)
G (Minor Third)
A (Perfect Fourth)
B (Perfect Fifth)
C (Minor Sixth)
D (Minor Seventh)
The natural minor scale can also be represented numerically as "1, 2, b3, 4, 5, b6, b7".
This means that to go from a major scale to a natural minor scale, you must flatten its 3rd, 6th, and 7th degrees.
Here is how the E natural minor scale looks on the staff. Notice how it uses the exact same notes as G Major but goes from E to E instead of G to G:
The G Major Scale on the Guitar
The following fretboard diagram represents the G Major Guitar scale on the guitar, from the open strings up to the 12th fret, after which the same pattern is repeated.
These are all of G Major's notes across every string and fret:
Each note has its own color to make it easier for you to identify every one of them in the 6 strings more easily.
Memorizing the location of every "G" in the fretboard would be a great start since it is the root note of the major scale we're analyzing in-depth.
One of the main goals of memorizing a scale throughout the fretboard is to be able to always visualize which notes sound good, so you can avoid playing a note that might sound awkward in an unwanted situation.
Another great exercise to carry out would be to play each of the G Major Guitar scale's notes against a drone in G.
Drones (not the flying kind!) can be found on streaming websites such as YouTube or Spotify. They are long, sustained sounds that establish a clear key center.
While you have that playing in the background, you should slowly play the scale and carefully listen to how each note feels in the context of G Major.
Becoming more acquainted with these "colors" or "sensations" will play a big role in your improvisation process when you have mastered your scales.
There are many more exercises that are worth trying, such as:
Play the G Major scale on one string only, ascending and descending;
Memorize the location of the root note on each string, and play them in sequence, ascending and descending;
Limit yourself to a region of 5-7 frets on the guitar's neck, and find all of the scale's notes without leaving that region;
Start memorizing the location of other relevant scale degrees (major third, perfect fifth, and major seventh).
While these will require some thinking and effort from you in the beginning, by creating and maintaining a practice routine that incorporates this kind of exercise, you will boost your fretboard knowledge exponentially in no time!
Additionally, the patterns you'll learn as you study this scale are movable, meaning that by shifting them up or down on the neck, you can easily play the major scale in other keys aside from G Major!
The following section of this guide introduces a well-known method that many players rely on to learn scales effectively on the guitar.
This method is commonly known as the "CAGED System."
CAGED System - The 5 G Major Scale Enclosures
The CAGED System is a method of learning the fretboard that consists of dividing it into 5 specific regions, often named "enclosures" or "boxes," and mapping out unique scale patterns that can then be moved all across the fretboard, covering all possible keys.
This makes learning scales much more intuitive and manageable since you don't need to learn several shapes for each specific key.
After you divide the neck into smaller sections, you can isolate them, learn them individually, and start connecting them later. This is all part of the process of being able to move freely across the fretboard.
Next, we will go over the 5 CAGED shapes in the key of G Major.
Each of these shapes is based on an open chord voicing that you most likely already know. The chords are the following:
C Major
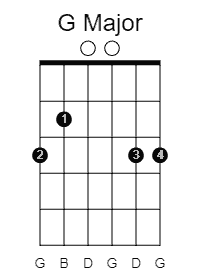
A Major
G Major
E Major
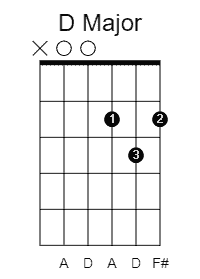
D Major
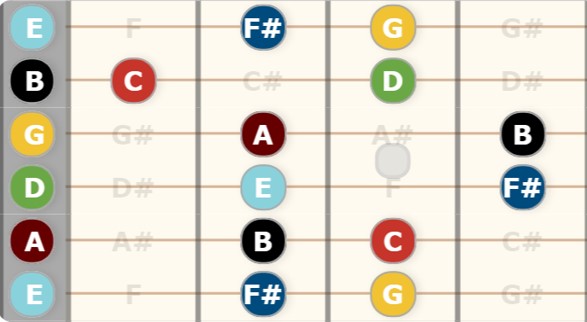
First Enclosure
The first enclosure of the G Major scale is located between the open strings and the 4th fret. This note pattern is based on the G Major open chord shape.
When studying these patterns, you should always be aware of where your root note is (in this case, G) since it is the note that you'll use the most as a reference to find these enclosures quickly while playing.
In this one, G appears three times - on the 6th, 3rd, and 1st strings.
You can cover two full octaves of G Major without having to move away from this region.
Lastly, you might notice that the note B appears twice in a row: on the 4th fret of the 3rd string and on the open 2nd string.
I would recommend playing the one on the 2nd string since it saves you from a trickier finger stretch. In any case, they are both correct.
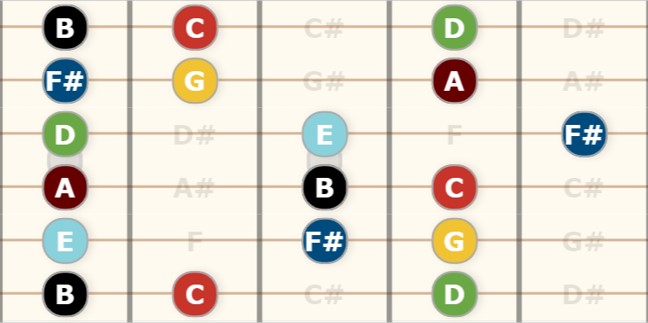
Second Enclosure
Our second box can be found between the 2nd and 5th frets. It is based on the E Major open chord shape.
The lowest note is an F#, which is the major 7th of our key center.
The root note appears three times - on the 6th, 4th, and 1st strings.
To play through this enclosure efficiently, you should place your index finger on that F# (2nd fret of the 6th string), and then your middle finger plays all notes on the 3rd fret, ring finger plays the 3rd fret, and the pinky finger plays the 4th fret.
Also, notice how these enclosures do not necessarily start with the root note.
While you should definitely know how to play this scale from G to G, it is equally important to know the location of every scale note within a specific fretboard region.
This shape also covers two octaves of the G Major scale.
Third Enclosure
The third CAGED enclosure can be found between the 4th and 8th frets. It is based on the D Major open chord shape.
The root note appears only twice in this region - on the 4th and 2nd strings.
This shape covers one full octave of the G Major scale.
You should play the three notes on the 6th string with your index, ring, and pinky finger, respectively. Then, shift your hand back one fret when changing from the 5th string to the 4th. Finally, shift it back up one fret when transitioning from the 3rd to the 2nd string.
Fourth Enclosure
In the key of G Major, the fourth enclosure is found between the 7th and 10th frets. This one is based on the C Major open chord shape.
The root note appears twice - on the 5th and 2nd strings.
Only one full octave of the G Major scale can be covered within this shape.
In this pattern, you also have a note that appears twice consecutively, which is the F# on the 3rd and 2nd strings. Once again, choose whichever feels most appropriate to you, depending on what you are playing. Playing the F# on the 3rd string will be a tougher stretch, though.
Fifth Enclosure
Our fifth and last G Major CAGED enclosure appears between the 9th and 13th frets. The same 5 patterns repeat themselves from the 12th fret onwards.
It is based on the A Major open chord shape.
The root note appears twice - on the 5th and 3rd strings.
This shape can only cover one full octave of the scale.
Play the lowest note (D on the 6th string) with your middle finger, as that will position your other fingers correctly to hit the next notes.
Useful advice on how to practice all of these shapes is available later in this guide, as well as tablatures to help you learn them faster.
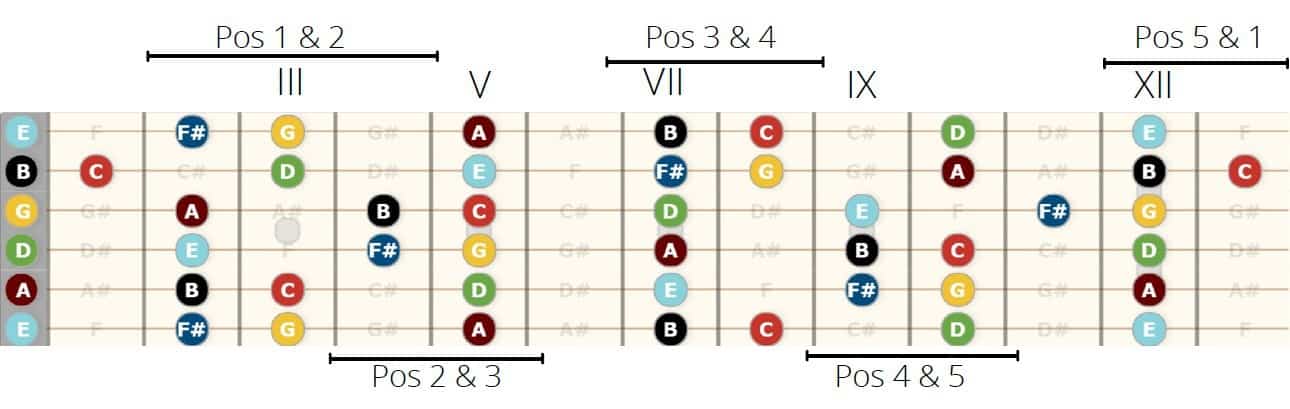
Connecting the 5 G Major Guitar scale CAGED Enclosures
When studying these patterns, you should always keep in mind that your end goal is to be able to glide effortlessly through the fretboard instead of being forced to play in the same region all the time.
The best way to start connecting the enclosures is to first figure out where they share some of their notes. These should be your primary points of reference when transitioning between boxes.
The diagram below illustrates the G Major scale throughout the fretboard, as well as highlighted regions where two positions have some notes in common.
The roman numerals refer to fret numbers.
To connect these shapes, you can use several different techniques.
For instance, you can use slides, shift your hand, use arpeggios, etc.
Start by isolating each enclosure first, and then work on being able to transition from one to the adjacent one.
This obviously takes time and effort, but the rewards for being persistent and motivated are high.
The G Major Scale in Notation and Guitar Tablature
This section will provide you with guitar tabs that show you how to practice the 5 CAGED enclosures.
All examples show you the full pattern, ascending, and descending.
You should first approach each one individually and only then start working on connecting them, as that is what will improve your skill to move throughout the whole fretboard.
Play each example at a slow speed (set a metronome to 60bpm) and play one note per beat.
Your main focus at this point should not be able to breeze through the pattern up and down. You need to create muscle memory slowly and also keep an eye out for the rote note locations in each shape.
You can increase the tempo slowly as you start feeling more comfortable and stop making mistakes.
Lastly, you should be aware that there are more ways to play the G Major scale, but knowing these 5 already gives you a lot of resources to use in any musical scenario.
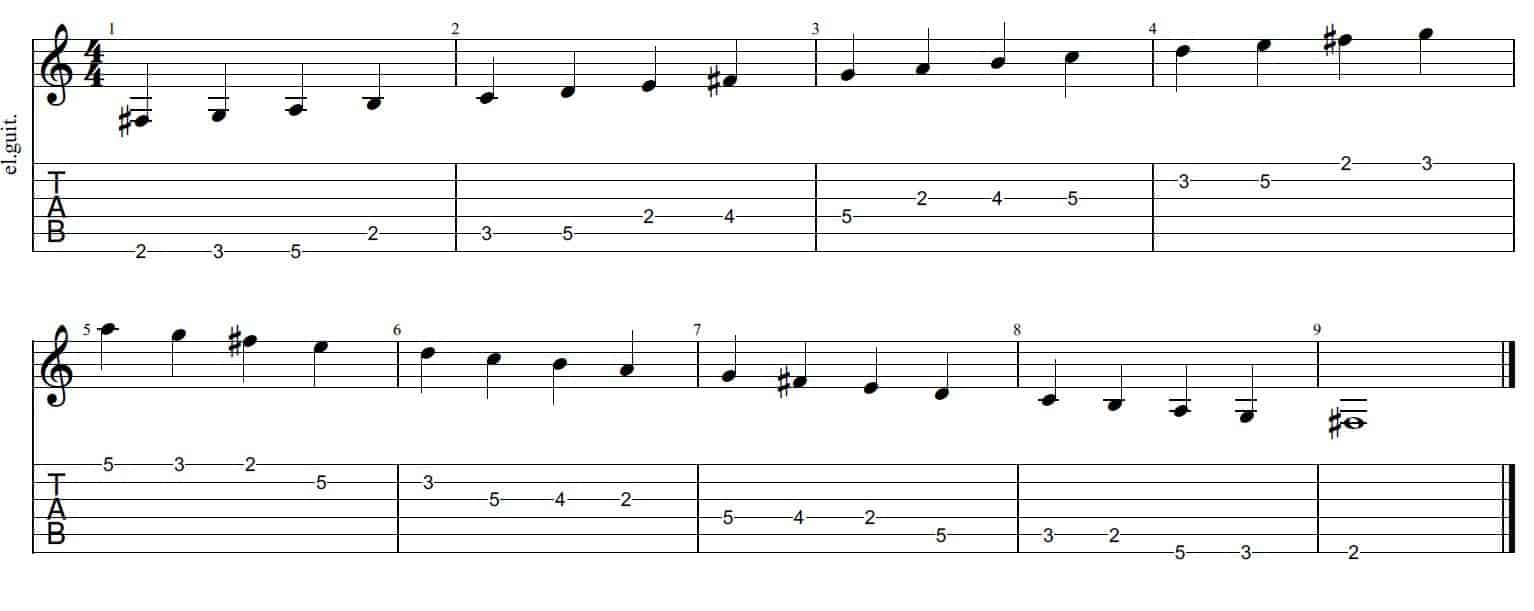
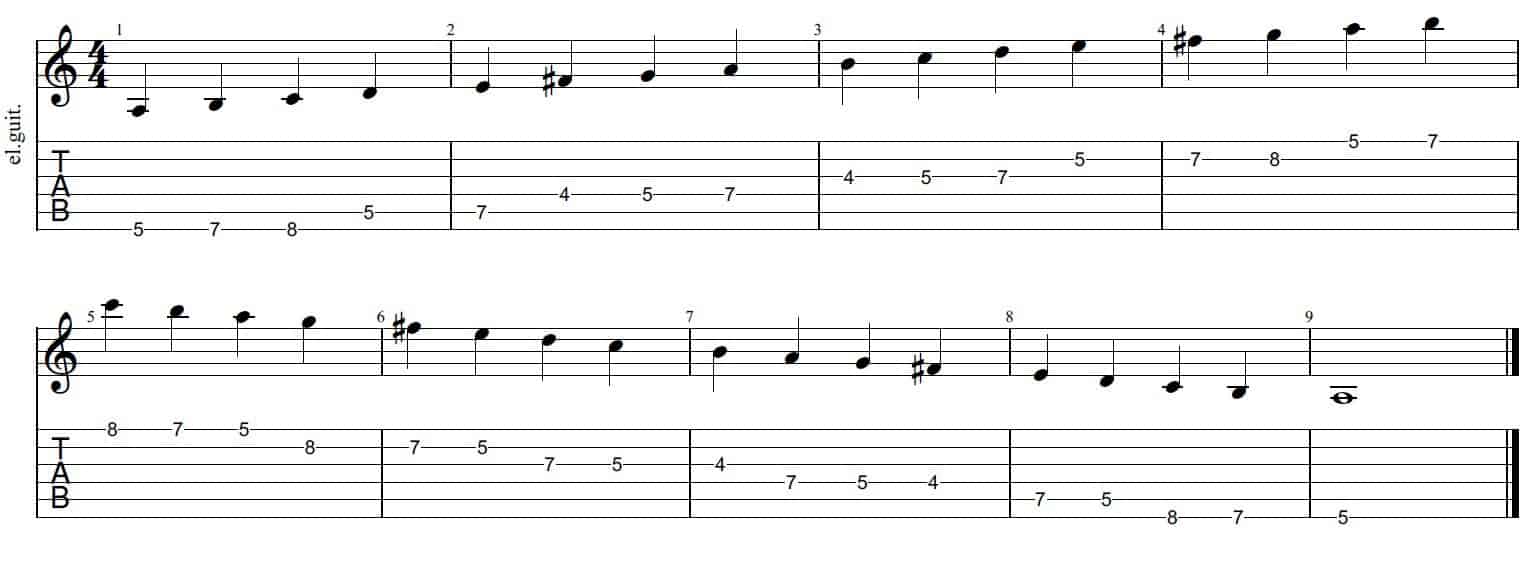
Tab Number 1
The following tablature shows you how to play through the first CAGED enclosure of G Major, both ascending and descending.
It is recommended that you study the scale both ways because your musical ideas won't have the same direction every time.
Remember that if you wish to transpose this shape to another key, you also need to transpose the notes that are being played on open strings!
Tab Number 2
The next tablature refers to the second G Major enclosure, which is based on the E Major open chord shape.
Start playing through this box with your index finger on the F# (6th string, 2nd fret), so your hand is perfectly positioned to play the whole scale pattern.
Remember to memorize where the root note is within each shape, so you can easily find this enclosure anytime.
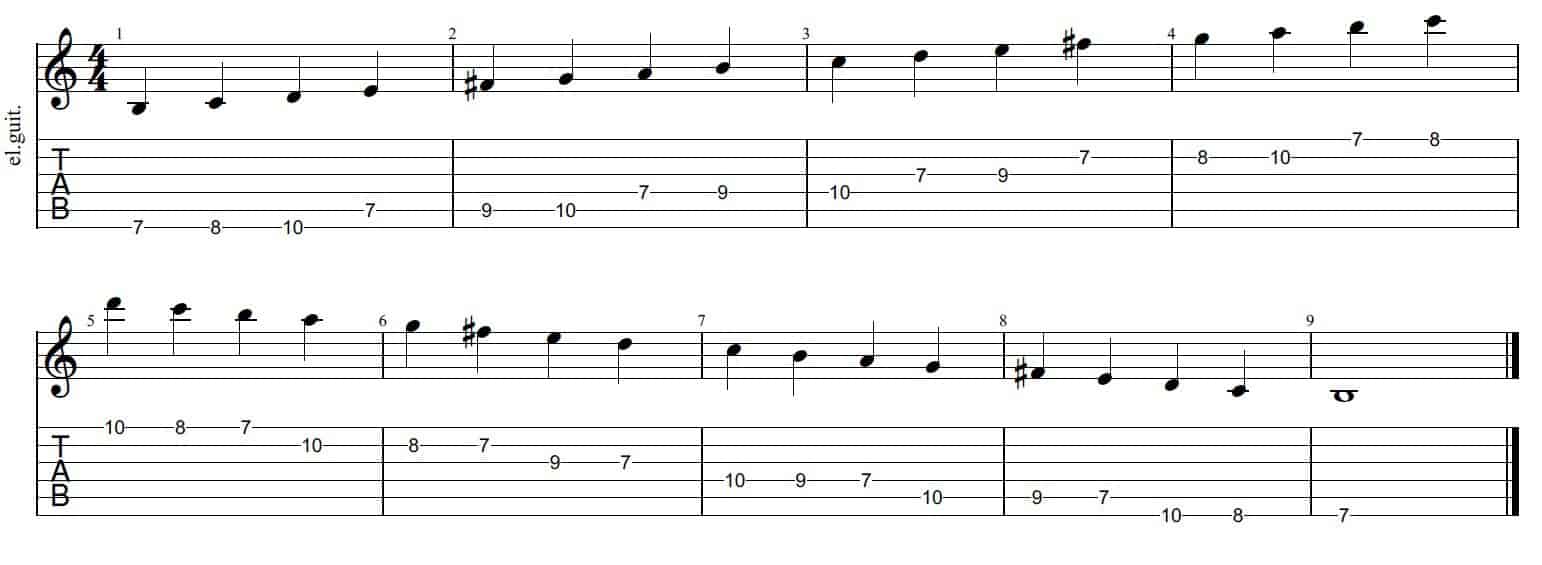
Tab Number 3
The third tab refers to the pattern based on the D Major open chord shape.
You need to shift your hand back one fret when going from the 5th to the 4th fret, and then shift it back up when passing from the 3rd to the 2nd string.
Remember, focus on building muscle memory first by playing this at a slow tempo, and bump it up gradually as you stop making mistakes.
Tab Number 4
The fourth tab teaches you how to play through the G Major enclosure based on the C Major open chord shape.
Start playing through this pattern with your index finger, and you won't need to move your hand throughout the whole exercise, as you can assign one finger to each of the 4 frets you will cover.
When studying any of these enclosures, you can also play the scale from root to root note a few times.
For example, in the following tab, the note G appears on the 10th fret of the 5th string and then again on the 8th fret of the B string.
Tab Number 5
The fifth and final tab illustrates the enclosure based on the A Major open chord shape.
You should start playing this one with your middle finger so that you have your hand perfectly positioned to execute the entire pattern.
After you have assimilated all the isolated patterns, practice connecting them when you're writing or improvising.
Focus on the areas in which two different enclosures share common notes; those are the best points of reference to travel through the fretboard.
What are the Chords That Can be Built With the G Major Scale?
If we take the G Major scale and harmonize each scale degree, we are left with the harmonic field of this key.
This is nothing more than the set of 7 chords that goes with each note of the scale.
Those chords are:
I - G Major
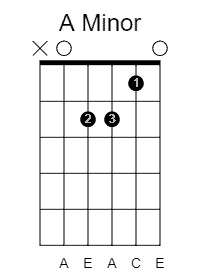
II - A minor
III - B minor
IV - C Major
V - D Major
VI - E minor
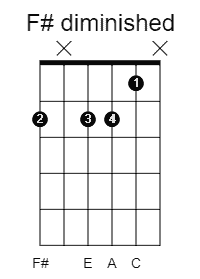
VII - F# diminished
Here is how the G Major harmonic field looks like on the staff:
On the guitar, there are several different possibilities of playing these chords, but the diagrams below show you some of the easiest options to get you started.
Try playing them in sequence and see if you can understand that you're playing the G Major scale, but with chords instead of single notes.
Afterward, maybe you can experiment and try to create your own chord progressions with these chords. You might find one that you like, and it could end up as the harmony for one of your compositions!
Lastly, it is worth keeping in mind that for any major key, every degree follows a pattern, much like the major scale itself does.
The chord quality (major, minor, etc.) of each degree is always the same, and it follows this rule:
I - Major
II - Minor
III - Minor
IV - Major
V - Major
VI - Minor
VII - Diminished
This can save you a lot of time since you can figure out the quality of any chord in any given key without having to write its harmonic field on a staff!
Which Songs Use the G Major Scale?
Many of the songs you have already heard are based on the G Major scale or use it at some point.
Here are a few examples so you can try to improvise over them using the shapes that you have learned with the diagrams and tabs shown before:
Neil Young - Rockin' in the Free World
Pink Floyd - Learning to Fly
The Beatles - Blackbird
AC/DC - You Shook Me All Night Long
Robben Ford - Revelation
The Monkees - I'm a Believer
The Beatles - A Hard Day's Night
Led Zeppelin - Travelling Riverside Blues
George Thorogood - Bad to the Bone
The Rolling Stones - Wild Horses
FAQ - Frequently Asked Questions About the G Major Scale
Question: What are the Notes of the G Major Scale?
Answer: The notes in the G Major scale are:
G
A
B
C
D
E
F#
Question: Which Chords Come From the G Major Scale?
Answer: If we harmonize each scale degree in G Major, we obtain the following chords:
I - G Major
II - A minor
III - B minor
IV - C Major
V - D Major
VI - E minor
VII - F# diminished
Question: What is the Relative Minor Scale of G Major?
Answer: The relative minor scale of G Major is E minor (E is the 6th degree of G).
This means that they share the same notes, although they are centered around a different root note.
Therefore, the E minor scale has the notes E, F#, G, A, B, C, and D.
That way, you have a minor third, minor sixth, and minor seventh instead of having major intervals.
Question: How Can I Learn the G Major Scale Efficiently on the Guitar?
Answer: By sticking to a thorough practice routine that covers the G Major scale across the entire guitar's neck, you will gradually advance your fluency when writing and improvising music in this key.
Using a resource like the CAGED System is a foolproof plan to ensure that you cover every neck region and make progress steadily.
Conclusion
G Major is a very popular key, so you better start working on getting this scale into your fingers as soon as you can.
It is one of the most similar scales to C Major (usually the first major scale taught to most musicians) since it only has one different note (F#).
Don't forget that, like all major scales, it follows a pattern of whole tones and semitones that can be described as "W; W; H; W; W; W; H," where W and H correspond to whole tone and halftone, respectively.
It can also be described numerically as "1, 2, 3, 4, 5, 6, 7" since all intervals are major or perfect.
Plan your own practice routine, be consistent, and you are sure to notice improvements early on!
Author
Gustavo Pereira
Gustavo isn’t like other guitar players; instead of paying for lessons from a guitar teacher, he traveled around the world to watch the greats. Along the way, he’s met some really amazing people that have shared some invaluable lessons that he hopes to share with anyone looking to learn the guitar. He doesn’t believe in all of the fancy talk that comes with learning the guitar; he wants to break down the basics so that no matter what type of musical experience you have, you’ll understand too.
Best Articles:
Everlong Amp Settings Guide
https://guitarspace.org/amps/everlong-amp-settings-guide/
Slipnot Amp Settings Guide
https://guitarspace.org/amps/slipknot-amp-settings-guide/
Stevie Ray Vaughn Amp Settings Guide
https://guitarspace.org/amps/stevie-ray-vaughan-amp-settings-guide/
Ever hit a G chord that feels bright and settled, then swap to G7, and suddenly it sounds a little…expectant? Like it’s leaning forward, waiting for the next page to turn. That “unsettled” sound is the whole point. G7 is a dominant seventh chord built from G (Root), B (Major 3rd), D (Perfect 5th), and […]
The first time I met B7, my hand froze. Four fingers, tight spacing, and one tiny mistake makes half the chord go dull. That is why I call B7 the Gateway Chord. It pushes your fingers to work as a team. You will hear it in Blues, Folk, Classic Rock, Jazz, and even acoustic metal […]
Hitting that beginner plateau on guitar can feel rough; you sit down to play, pick a song you love, and realize it is way beyond your current skills. That kind of mismatch drains motivation fast. The smarter move is to start with songs that sound great but use simple building blocks like open chords, standard […]